December 14, 2021 k8s kubernetes security falco digitalocean
Falco is a CNCF incubated project that provides real-time threat detection for your Kubernetes clusters. In part 1 of this post, we will go through setting up Falco on your K8s cluster. Any rules triggered will be posted to a webhook URL but Falco can be configured to send events to a number of other providers; the full list can be found here.
Setting up
We will be using DigitalOcean’s Managed Kubernetes service to set up our. DigitalOcean has detailed instructions on creating a cluster using their control panel here - https://docs.digitalocean.com/products/kubernetes/how-to/create-clusters/.
Once your cluster is setup, download the config file and update your ~/.kube/config so that kubectl knows about your cluster. Do note that if you go down this path, you will need to download and update the config every 7 days.
Installing Falco
Setting up Falco on your cluster is pretty straight forward. Falco provides helm charts with sane defaults including default rules that should be good enough to get started with detecting threats to any cluster.
- Install
falcohelm charts
helm repo add falcosecurity https://falcosecurity.github.io/charts
helm repo update
- Switch the context to point to your new cluster on DigitalOcean
kubectl config use-context do-<your-cluster-name> - Create a new file
config/values.yaml. This file will contain our custom configuration for sending events to our webhook URL usingfalcosidekick. In the configuration below, we are configuringfalcoto forward any events to thefalcosidekickservice making sure that events are output in JSON format. Forfalcosidekick, we configure our notification channel which is a webhook in our case with any custom headers that need to be sent as well as the minimum priority for events that should it should be triggered for.
falco:
  jsonOutput: true
  jsonIncludeOutputProperty: true
  jsonIncludeTagsProperty: true

  httpOutput:
    enabled: true
    url: "http://falcosidekick:2801/"

falcosidekick:
  enabled: true
  fullfqdn: false
  config:
    webhook:
      address: "https://mywebhook.com/"
      customHeaders: "X-Webhook-Secret:12345"
      minimumpriority: "notice"
      mutualtls: false
      checkcert: true
- Install the chart on our cluster using
helm
helm install falco falcosecurity/falco -f config/values.yaml --namespace falco
- If everything goes to plan, wait for the
falcoandfalcosidekickpods to be in theReadystate
Testing our setup
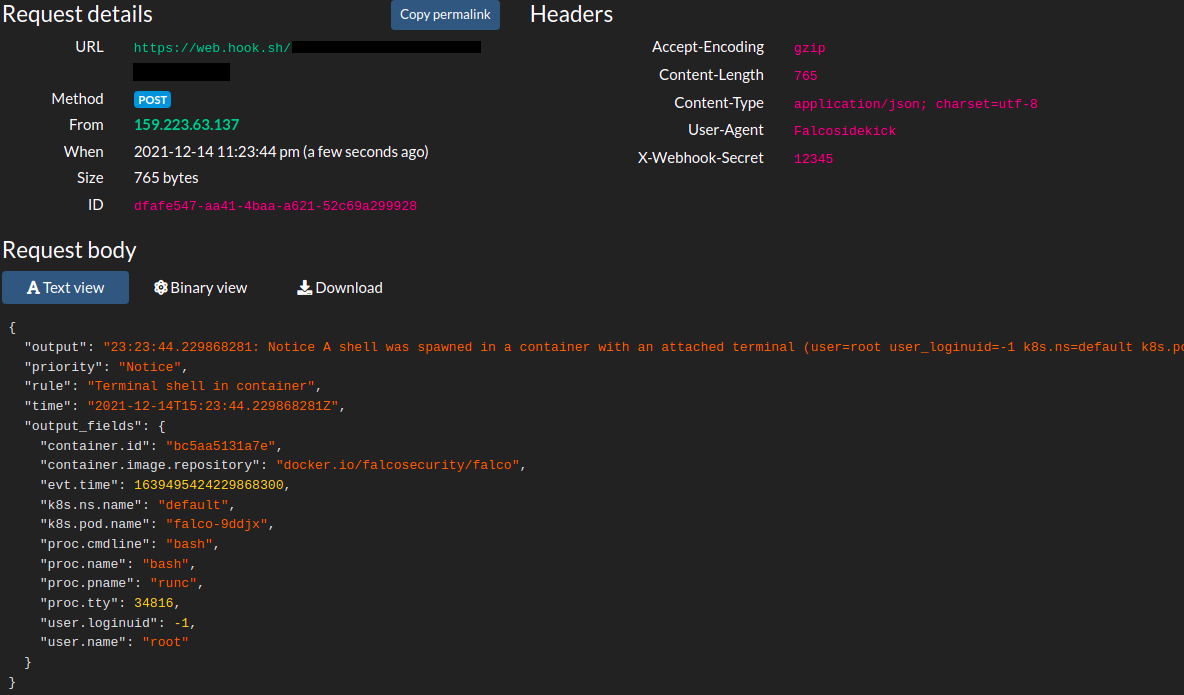
To test that our setup works, we can trigger one of the default rules that falco ship with - if you spawn a shell in any of your running pods in the cluster, falco will trigger a notice event. We can use one of the falco pods itself to test our setup.
- Use
kubectlto spawn a shell
kubectl exec -it falco-e212 -- /bin/bash
- You should immediately receive an event on your webhook informing you of this event (tip: use a tool like web.hook.sh) to test your webhooks).
And that’s it! We have successfully setup falco on our cluster. In part 2 of this post, we will look into defining custom rules for falco and set up k8s audit events. The full code for this can be found here.